DIY GPS for the Yaesu FTX-1 Field using a NEO-6M Module
The Yaesu FTX-1 Field supports an optional GPS unit (the FGPS-5), but at ~€80 it’s hard to justify when a GY-GPS6MV2 (NEO-6M) module costs about €5. With a 2.5mm TRRS cable and a soldering iron, you can wire your own GPS solution for a fraction of the price.
What You Need
- GY-GPS6MV2 (NEO-6M) GPS module
- 2.5mm 4-pole (TRRS) audio cable with bare leads
- Multimeter (for continuity testing)
- Soldering iron
- Optionally: 3D printer or the 3D-printed case from Printables
The GPS Port on the FTX-1
The FTX-1 has a dedicated 2.5mm GPS terminal on the rear panel, documented in the manual as the connector for the optional FGPS-5 unit. The pinout is:
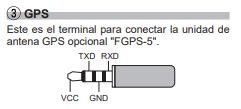
| Pin | Signal |
|---|---|
| Tip | VCC |
| Ring 1 | TXD |
| Ring 2 | GNC |
| Sleeve | RXD |
Wiring the Cable
I used a 2.5mm TRRS cable with four colour-coded wires. After testing continuity with a multimeter to identify each conductor:
| Cable colour | GPS module pin |
|---|---|
| Red | VCC |
| Green | GND |
| White | TX |
| Black | RX |
The NEO-6M module outputs 3.3V TTL serial at 9600 baud and NMEA sentences by default, which is exactly what the FTX-1 expects.
3D Printed Case
To keep things tidy in the field I printed the GY-GPS6MV2 case from Printables. It fits the module and the patch antenna snugly, and keeps the wiring protected during transport.
Result
After connecting the module to the FTX-1 and placing it with a clear view of the sky, the radio acquired a GPS fix within a couple of minutes and displayed the coordinates on the GPS screen:

The satellite bar graph fills up, time syncs automatically, and the radio can now use GPS-aided features like APRS position beaconing and automatic time/date setting — all for the price of a coffee.
Notes
- The VCC rail on the 2.5mm port provides 3.3V, which the NEO-6M runs on natively. No voltage regulator needed.
- Keep the cable short to avoid RF pickup near the antenna connector.
- The patch antenna needs a reasonably clear sky view — indoors performance will vary.